Classes are a great way to break those winter blues, get out meet new people and learn a new skill. I look forward to seeing many of you out there today!
Craft on!
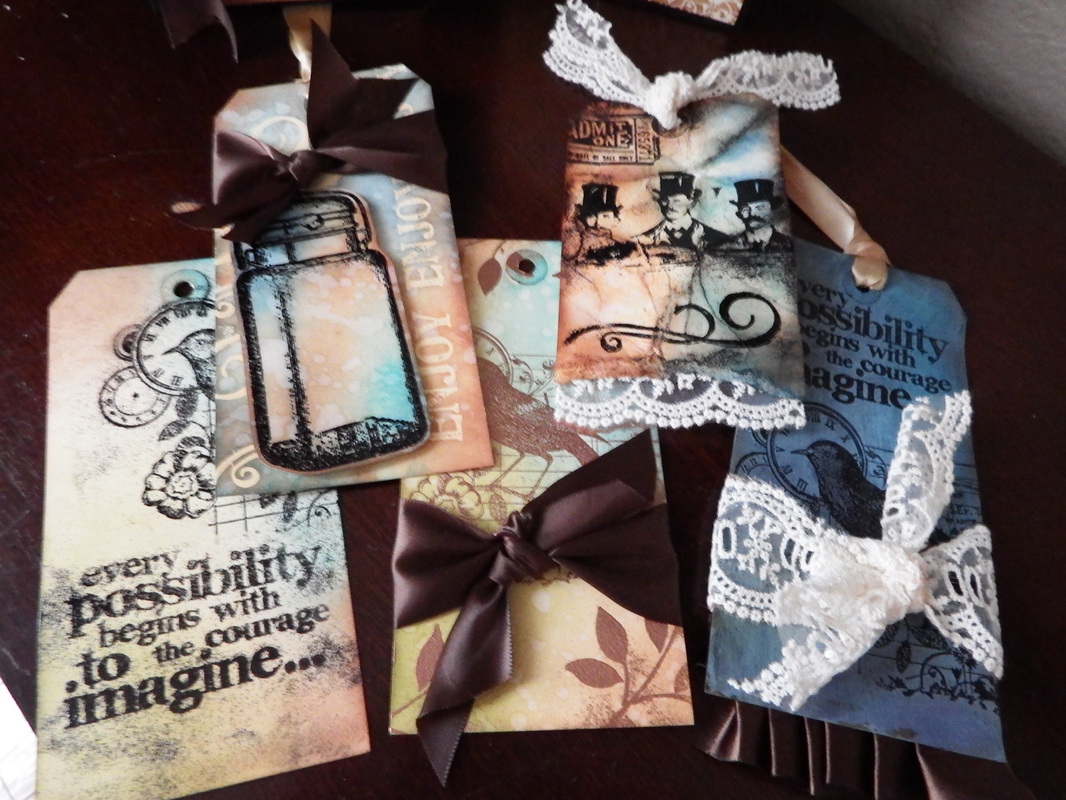
Stop on out today at the Michael's store in Goshen from 11-2 to sign up for a paper crafting class where you can learn how to and create Tim Holtz tags like the ones pictured here or a number of other projects available. And during the open house from 11-2 only; you purchase a class, you can receive $20 worth of class supplies for free just buy purchasing a class session!
Classes are a great way to break those winter blues, get out meet new people and learn a new skill. I look forward to seeing many of you out there today! Craft on!
0 Comments
So, shame on me. It has been a rough week. It's been midterm week at school, and I have a huge even this Saturday debuting as the new papercrafting instructor and my first class starts Sunday. Needless to say, I've been a busy girl! So busy in, in fact, that I haven't had time to do or plan a project for this coming Sunday. Regrettably, I have decided to not do one this weekend as to not overload myself with school and projects. I didn't think it would be fair to show a project that I didn't give everything I had and that I could be proud of.
So, I do plan to have a couple of bonus items during the next week and get right back in to the swing of things next weekend. Now, with that said, this girl is pooped and I'm gonna head to bed before the next 3 busy days get a head start on me. If anyone of you are working on a project this weekend, I would love to hear about it and see them, so comment and let me know what you are wo Ok, everyone remember the Valentine treat bags that was posted almost a month ago? I did say that you can change the colors and embellishments to match any holiday or occasion...so here's my St. Patrick's Day treat bags. And to make this post even sweeter...I will be giving these guys away this saturday (March 8th) to those who stop in to Michael's Class Open House. I will be set up and showcasing my scrapbooking and papercrafting projects and signing people up for classes. So stop on by and say Hi this Saturday from 11 a.m. to 2 p.m.!
I've been working on quite a few different projects lately...everything from stuff for my Etsy Store to demos for my upcoming paper crafting classes and eventually stuff for my own collection...eventually...
I've heard a lot of people say "I wish I was creative so I could make stuff like that" or "If I was a crafty person, I would make some of those things!" I'm here to tell you that with just a few very basic tools and a simple layout, YOU can make cute handmade cards that you can be proud to give to anyone! Let's not waste anytime and jump right in! I received a lot of good feedback from the shamrock card that posted a couple of weeks back. Unfortunately most of it included a lot of; "If I was a crafty kind of person I would make that card!" So, I thought for this week's project, I could show some of you how to make a very simple card that you can adapt for almost any occasion. All you will need is a few basic supplies and a reason to give a card. You will see that you don't need to be a "crafty person"; you just need to follow a few basic steps to creating your very own pieces.
So, grab your java and stop back this Sunday and check out this week's homemade card! Also, remember that in just a few short days, I will be offering paper crafting classes locally. This classes are everything from beginners scrapbooking to advanced techniques, all levels of card making, and other, fun paper crafting classes. If the idea of taking on this new hobby seems a bit daunting or you just want a reason to get out of the house, have some fun and meet some new friends with the same hobby as yourself, then contact me for all the information! I look forward to seeing you all back on Sunday and as always...craft on! Well, another Sunday has almost come to pass and I'm finally getting around to posting this week's project. I had a lot of fun with this one and I hope everyone gets inspired with it. As a word of warning, I am expecting my new camera (yay, me!) to come this week and some of these pictures were taken with my other half's phone and they are...well... not so perty. But if anyone has any questions, let me know!
I don't know about you all, but I am a total Pinterest nut! I could seriously spend hours pouring over everything from clothes, and crafts to food and animals. I think it goes without saying that as a craft blogger that I have a TON of papercrafting pins. But, as I peruse the DIY & craft section of my beloved Pinterest; I have noticed as of lately many gold dipped and leafed items. It seems that the current fad is to dip everything from mugs to fingernails in the shiny stuff. So, where am I going with this? Well, I like to find inspiration for a new project in everything from obvious stuff like patterned papers to fabrics and many times my ideas come from what's hot now, and not necessarily anything to do with papercrafting. So, while trying to figure out my Cuttlebug isn't cutting (yes, I was still trying to figure that mystery out 2 days later) I managed to cut out a set of stackable medallions (also trending on Pinterest), I decided to bust out a gold leaf pen that I had purchased for another unrelated project and get my $8.99 worth's out of it. So, here it is..... Also pictured is the gold leaf pen that I used in case you are unfamiliar with them.
So, I hope you all enjoy it and hopefully it inspires you to find your own inspiration for your next project in an unlikely place. Good night and craft on! Whew! It's been a whirlwind of a week! I usually post on Wednesdays about this week's upcoming project, but as you see I'm doing in today; because well...I didn't make up my mind until just now.
I've spent way too much time this week trying to figure out my new Cricut machine and Cuttlebug. I'm still kinda lost with the Cricut; but I will figure it out. So, for this week's project, I thought I would show you guys how to do a simply project similar to what I sell on my Etsy page. I'm going to show you what you can make yourself with an old frame, some burlap and a few extra embellishments. This project will breathe new life into an old piece and give you a great item to hang on your wall. Stop back on Sunday to see what it's all about! Now, back to this silly Cricut... Take care and craft on! So, the original plan was to theme this project for St. Patrick's Day but after some thought, I know that many people don't really do cards give away things for this holiday. So...I'm calling this the shamrock card. The idea behind this card was more to show another use for a heart punch, beyond that of punching out hearts. Say you have a heart punch that you purchased for..oh, I don't know...a certain Valentine's craft. Perhaps some really cute Valentine boxes (wink, wink!). Now, you have a punch and your project is all made, what is something else that you can do with this thing? Well, this post gives you yet another (of many) things you can do with your heart paper punch. Let's get started...
To keep in the spirit of this past week's post, I will be making a St. Patrick's day theme card using a heart punch. This card will be versatile and can be used for more than just the holiday. AND, it will feature another use for a shape punch. Because who wants to spend over ten dollars on something that you can't get another use out of? Not this girl! I just love things that I can get more than one use out of or for. Check back on Sunday for instructions to this week's project!
Craft on! I just finished this scrapbook layout and I love it so much I just had to share it! I wish the picture did it some justice! Maybe this will provide some inspiration for your own pages. I have all boys, and I've always wanted a reason to do a super girly layout. Now that I need to have some sample pages done for my classroom space, I took advantage of it and was finally able to do something really feminine but still a little rustic.
Anyways, I have a bed and a pillow that are calling my name; so goodnight folks! Valentine's Day is almost here! In fact it's just days away. While I was brainstorming this week's craft, I figured that almost everyone likes and probably receives some kind of candy for the holiday. So, it got me thinking...Who wants to go out and buy the same ole boring heart shaped candy box when you can make your own personalized candy gifts? Don't be afraid...they are easy and you can make a bunch of them up in under an hour. Ok, let's get started!
Before you begin, you will need a few basic supplies. If you do any type of paper crafting or scrapbooking, then chances are you will have most; if not all of them on hand. Valentine's Day is just right around the corner! This week's craft will be a cute, super-simple, inexpensive and fast way to give candy. These would make great gifts for neighbors, teachers, co-workers or you could even whip up a bunch of these for your child's classroom party! Come back on Sunday to find out how to make these cute treat bags!
Craft on! I'm sure that many of you with school-aged kids have either heard of or have kids that own at least one of these Rainbow Looms. My two youngest boys each have one and I am constantly finding their creations all over my house. They ran out of room in their storage cases for their bracelets and other things they have made. After making cookies one day, I had an empty oatmeal can and an idea. I generally like to recycle or re-purpose almost anything that I can. It's who I am. Why should I pay a ton of money when I can make something AND give a new purpose to something that would normally go in the trash. It's a win-win. I save money and it's easier on the environment! So here's this week's tutorial for the oatmeal can-turned loom band storage can...
To get started you will need: ~1 oatmeal (or any clean, empty can with a resealable lid) ~ One 12"x12" piece of scrapbook paper (your choice of style) ~Adhesive (I used a refillable scrapbook runner adhesive because it's what I have and am used to) ~Washi tape that matches your design ~1 Chalkboard Label (I found mine in a $1 bin at my local craft store!, Score!) ~Embellishments of your choice. Have fun with it! Almost every parent that has elementary and middle-school aged kids has at least heard of a Rainbow Loom. My two youngest boys received them for Christmas and love them. Coming up this weekend, I will feature a project that uses an empty oatmeal can and solves a Rainbow Loom problem at our house. Check back this Sunday to check out this week's project!
When I decided to start my own crafting blog, I went through a ton of possibilities for my first project. First, I had to ask myself what type of craft did I want to do. Scrapbooking? Cardmaking? Re-doing a piece of furniture? Knitting? And then it hit me... I craft for the same reason that many of you probably also do; because I like to make new things that I can use around my house or give as a gift. So, after checking my Pinterest (I'm a total addict) craft board, I decided to work on a project that I had seen some time ago.
Being on a very strict and tight budget, I plan out meals at least a week in advance. This stops the extra trips to the grocery store; only allows me one day per week where I'm pulling the hair out of my head trying to decide on meals instead of daily. And lastly, and perhaps most importantly this project will end the constant, "Mom, what's for dinner tonight?" Anyways, let's get started.... I found my inspiration for this project on Pinterest. I tried to link to the original site, but apparently the site has been blocked and I am not able to give credit to the original idea. The idea was a basic 12"x12" frame with scrapbook paper behind the glass with stickers for the days of the week. Very cute, and pretty basic. While I don't knock the idea; I love to embellish my projects and add my own unique touches to all of my work (some unintentionally :) ). And away we go!... I love crafting. There, I've said it. I also have an addiction. Crafting. I love to learn how to make new things, use new techniques and of course; try out all of the new products! I have tried everything from scrapbooking to knitting and floral design to sewing.
My hope is to provide a place where my fellow crafters can learn, share new ideas and possible find inspiration to create their own projects. Not every idea is always a success and I post those too. My hope is get ideas and help for my own projects and to save others from their own "crafting nightmares". Yes, I have had many. Many of my adventures will be new to me and others will working on an old technique. I'm not a professional at all; I'm just a woman with a undying love for all things crafting. I hope to post a new project weekly. I will try my best to give directions and pictures. My blog is sponsored only by my own wallet and passion for good deals and great crafts. All my projects will be open for comments. If anyone has a question, or would like to suggest a craft for a future post; feel free to contact me through the e-mail page. I hope y'all enjoy my blog as much as I look forward to this adventure! Craft on! |