Many times people will tell me that they would do cards or scrapbook if they had either the money or the creativity, or both. And I'm not going to lie; paper crafting can be expensive...but it absolutely doesn't have to be! I'm gonna share my tips and tricks for all you beginners out there who have been wanting to get started
I love to look at all of the new trends. I REALLY love it when I can learn a new trend and it turns out this darn good! This particular has been around for a couple of years, but I just came across it within the last month or so. I've trying to figure out a way to incorporate it into my current teaching schedule and I will be adding this to my regular stamping card class.
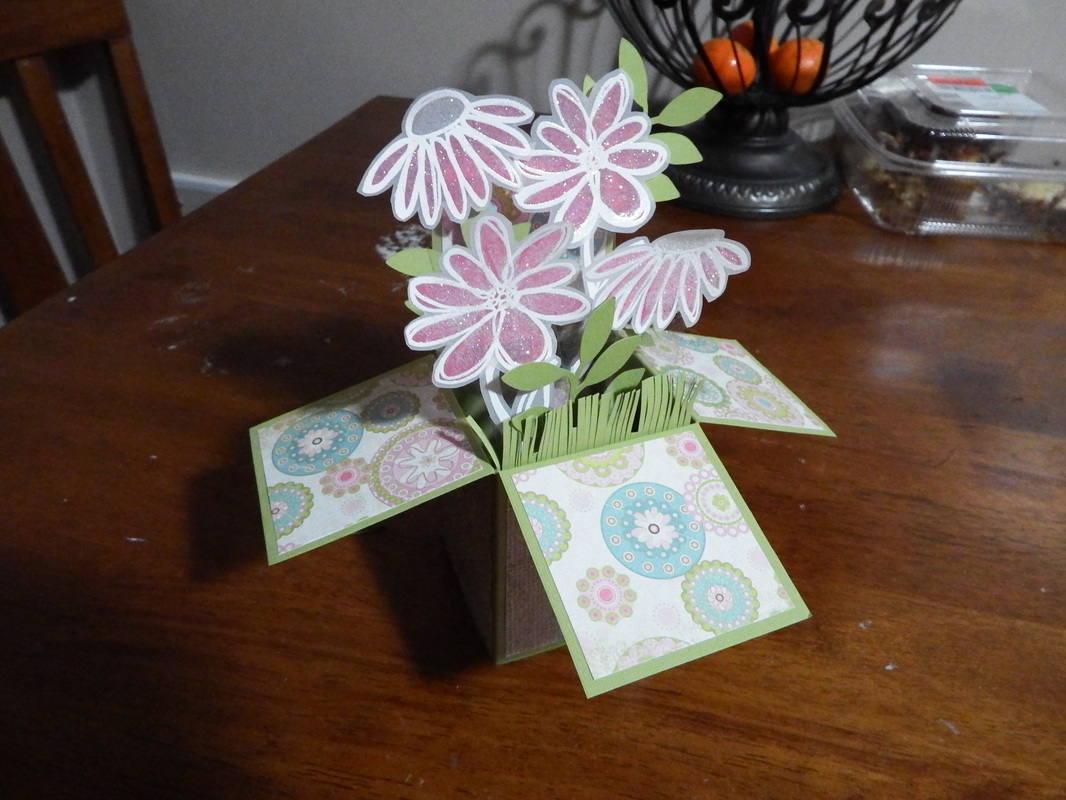
This card is 3D, stand up on it's own and folds flat so that it can fit into a 6 x 8 envelope. I'm so excited to teach this! Come visit me at work tomorrow from 2-4pm while I demo this project and get everyone signed up to learn this great new project! This makes a great gift for spring time holidays like Easter and Mother's Day. Hope to see everyone o A big question that I get asked a lot at work is from new scrappers and beginning card makers is "What do I need and should buy when I'm starting out?" This Sunday's blog is all about What you need, what can wait and what you really don't need.
It's a busy week, with starting a new job, classes and a demo this weekend, and a ton of homework. I'm burning the candle at both ends (again) this week but I didn't want slight y'all and not post something. So, while there will not be a project, there will be tons of information that will be just as informative and useful on your crafting journey. So, until Sunday my creative friends...craft on! 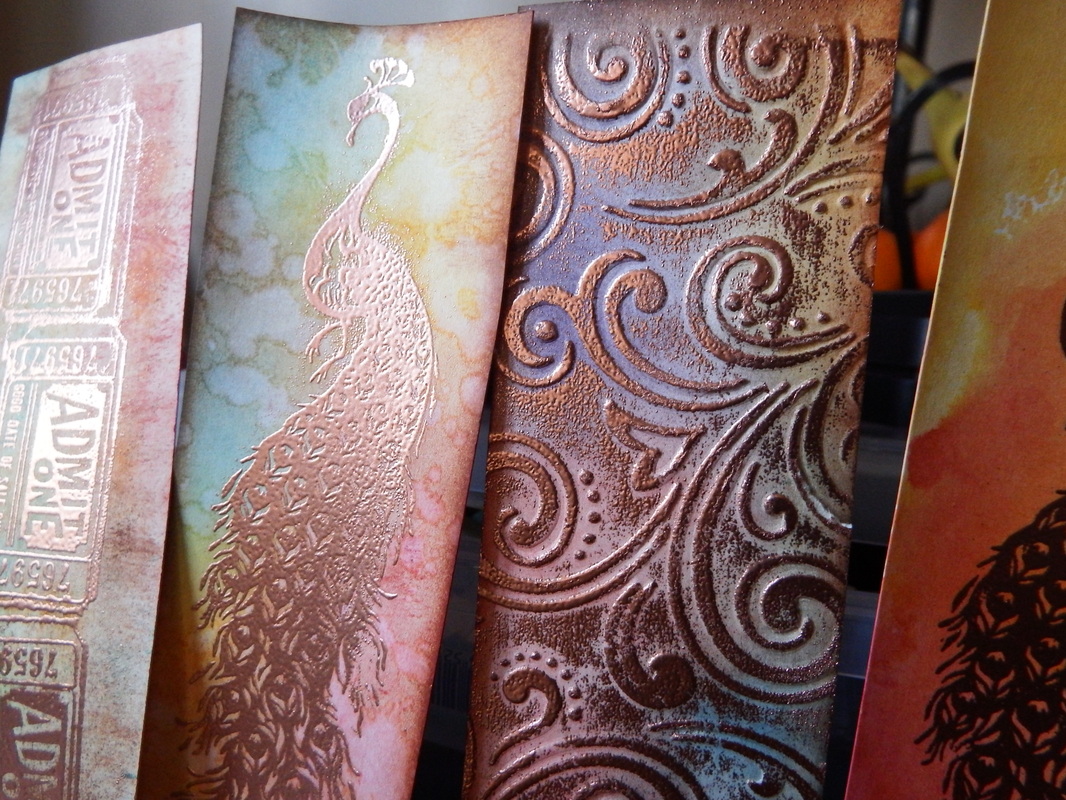
I finally have a heat gun so that I can show you how awesome these bookmarks are when they are heat embossed.
Just to prove how easy this project is, my seven year old, Matthew did the bookmark on the far left...and it turned out pretty good! Seriously folks, this isn't hard. The second bookmark was done with the basic technique and some water splattered on it and dried The third bookmark is a technique that I am really proud of because it is one that I came up with myself; using an dry embossing folder AND heat embossing. Speaking of embossing folders, Anna Griffin's new emboss and die set for the Cuttlebug came out today and drool every time I see it....one day... Finally, the last folder has a watercolor effect to it using the ink pad and spritzer to make it. Below is a better picture of all 3 bookmarks that I made 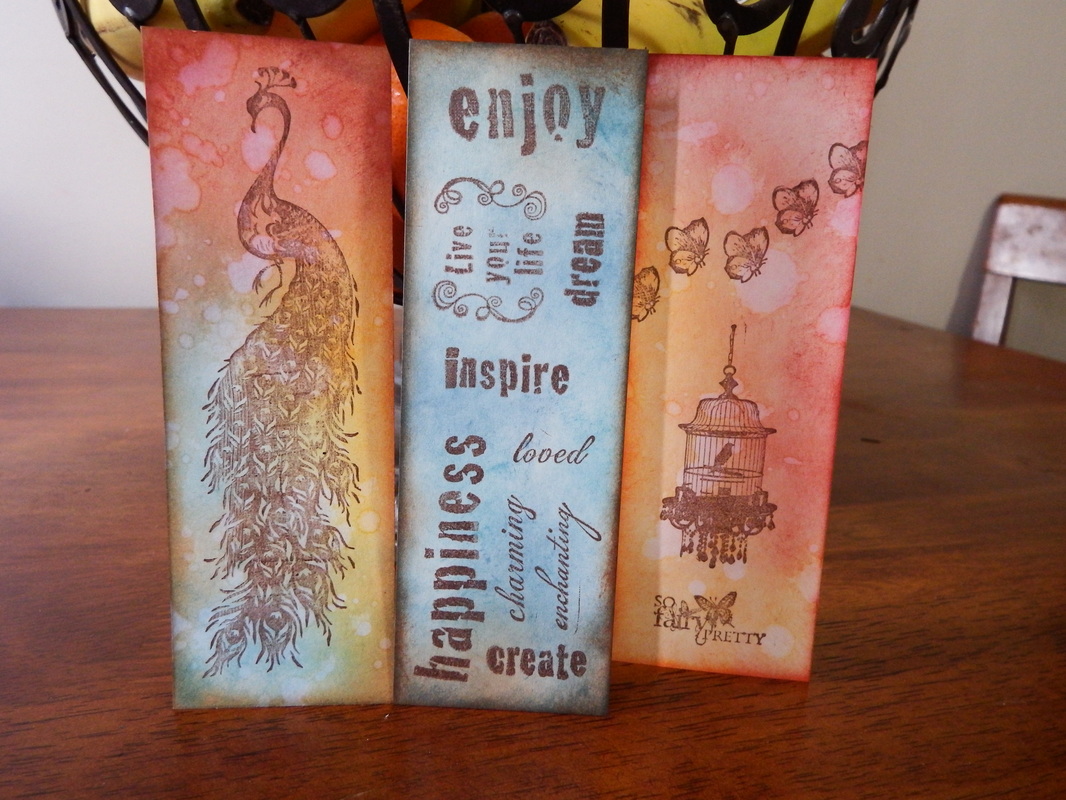
I teach several different classes for paper crafting, but the class and technique that always gets the most attention and comments is the distressing technique. Everyone is always commenting on how good the tags look and how it looks really hard to do. Well, I'm gonna give a quick and shortened version of this class. There are several different versions and techniques that I teach in this class and this is the most basic one. I say basic, but the only thing that is basic is the effort, the results are still very cool! Let's get started!
It's happened again.... another busy week! Lots of new things happening this week; including a new job, a custom project that I've been trying to find the time to do, extra hours at my part time job, and the list seriously goes on an on. So what am I getting at? Well, I usually have my plan for this week's project but I haven't been able to come up with any good ideas. So, I guess as Sunday rolls around, you all will be just as surprised as myself to see what I'm going to have!
Tomorrow is also my monthly, evening crop and I'm excited to be able to get some projects done without having to worry about kids bothering me, doing house cleaning and other the other details that detour my paper crafting plans! I look forward and encourage everyone to stop out and say hi, use my stuff and pick my brain. I love to teach what I do and I love to have company while I do it! Also, I wanted to share a new blog from a friend of mine that is just getting hers started. She's a mom of 7 that can cook her butt off and would really appreciate some new traffic to her blog! So head on over to Ragtime Kitchen Dance, scope out her brand spankin' new blog, say howdy and tell her that Melissa sent ya over! 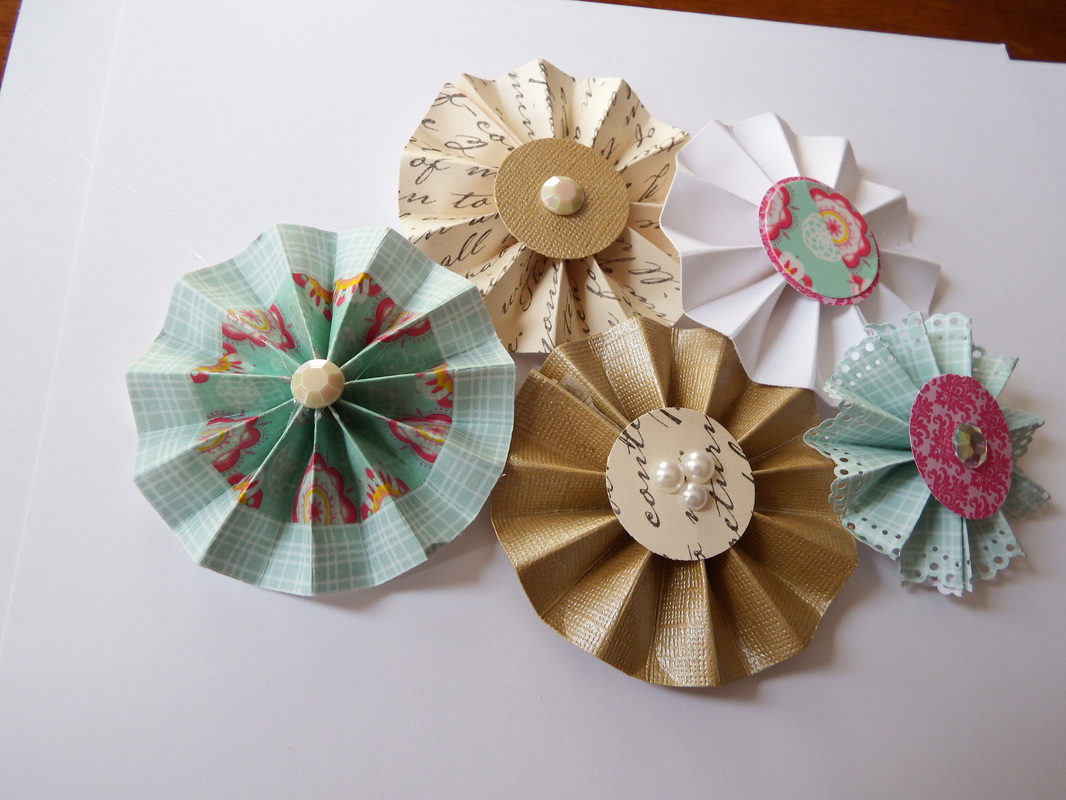
I absolutely love a cute project that doesn't take a lot of time. And I love being able to make my own embellishments myself. Store bought embellishments can be expensive, so finding ways to make my own to match what I'm working on AND save money? I'll take it! These rosettes were super-easy to make and can be done with just a few supplies and a few minutes of your time. Let's get started!
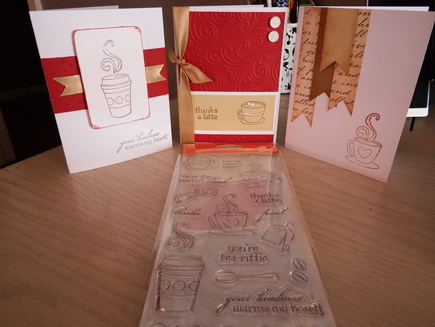
It feels like it has been forever since I've posted anything....Ok, almost a week but it still feels like forever to me. I was working on some cards last night with a new stamp set that I purchased and would like to show you what you can make it less than an hour. The stamp set was purchased for around $6 and with other materials, you are looking at another $2. BUT, these items could have easily made another 3 or 4 cards. Making your own homemade cards doesn't have to be expensive or time consuming. So, here's some tips on what to buy when you are just starting card making:
1. Coupons! All of the major craft stores have them...use them. Many times, if something is not on sale that week, use a coupon to get your higher priced items cheaper. This would be great for getting a 12'' paper trimmer or even a pack of stamps! Make trips to all of the stores if you have to. If you don't want to pay full price for 3 items, then go to 3 different stores to use them coupons. There's more than one way to skin a cat! 2. Buy a pack of card stock in colors that you can use for many different projects. I always recommend a pack of white, tan or black. Almost everything goes with these colors! 3. Buy your inks the same way you would paper. Go for brown or tan. You can get away with using either one in almost any project. 4. Choose a set of stamps that has many different uses to it, such as one that includes different sentiments, like: "Happy Birthday" or "Thank You". These types of stamps will be used a lot on the front of your cards and it's always a good idea to have that one "go to" set. 5. If you're completely new to card making, ask questions. Ask store employees, find a group of crafters, join a classes. (Prepare for shameless plug) Some places even have nights where you can just go to work for an evening. Take advantage of this and pick the brains of the crafters and instructors there. (See!) Everyone has to start somewhere and we have all been there. 6. Buy inexpensive products as you're learning. It's inevitable that it will take a little practice and patience when you're learning. That being said; there will be lots of wasted paper, adhesive and products. So, save a little money and buy the store brand card stock. 7. Clearance aisles! They will be your best friend for creating your new stash. Check them and take time to pick through them, you never know what you can find! Don't be intimidated my card making, it's easy, fun and doesn't have to cost you a small fortune to create great handmade cards! Until Sunday...Craft on! 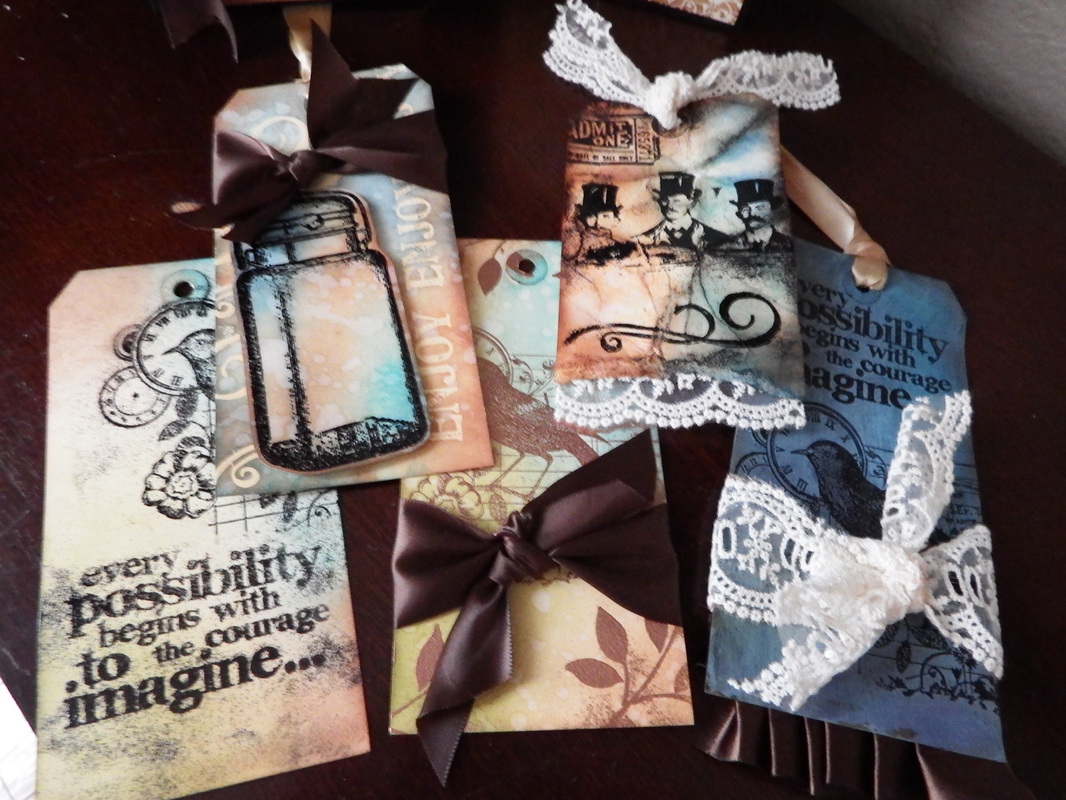
Stop on out today at the Michael's store in Goshen from 11-2 to sign up for a paper crafting class where you can learn how to and create Tim Holtz tags like the ones pictured here or a number of other projects available. And during the open house from 11-2 only; you purchase a class, you can receive $20 worth of class supplies for free just buy purchasing a class session!
Classes are a great way to break those winter blues, get out meet new people and learn a new skill. I look forward to seeing many of you out there today! Craft on! So, shame on me. It has been a rough week. It's been midterm week at school, and I have a huge even this Saturday debuting as the new papercrafting instructor and my first class starts Sunday. Needless to say, I've been a busy girl! So busy in, in fact, that I haven't had time to do or plan a project for this coming Sunday. Regrettably, I have decided to not do one this weekend as to not overload myself with school and projects. I didn't think it would be fair to show a project that I didn't give everything I had and that I could be proud of.
So, I do plan to have a couple of bonus items during the next week and get right back in to the swing of things next weekend. Now, with that said, this girl is pooped and I'm gonna head to bed before the next 3 busy days get a head start on me. If anyone of you are working on a project this weekend, I would love to hear about it and see them, so comment and let me know what you are wo 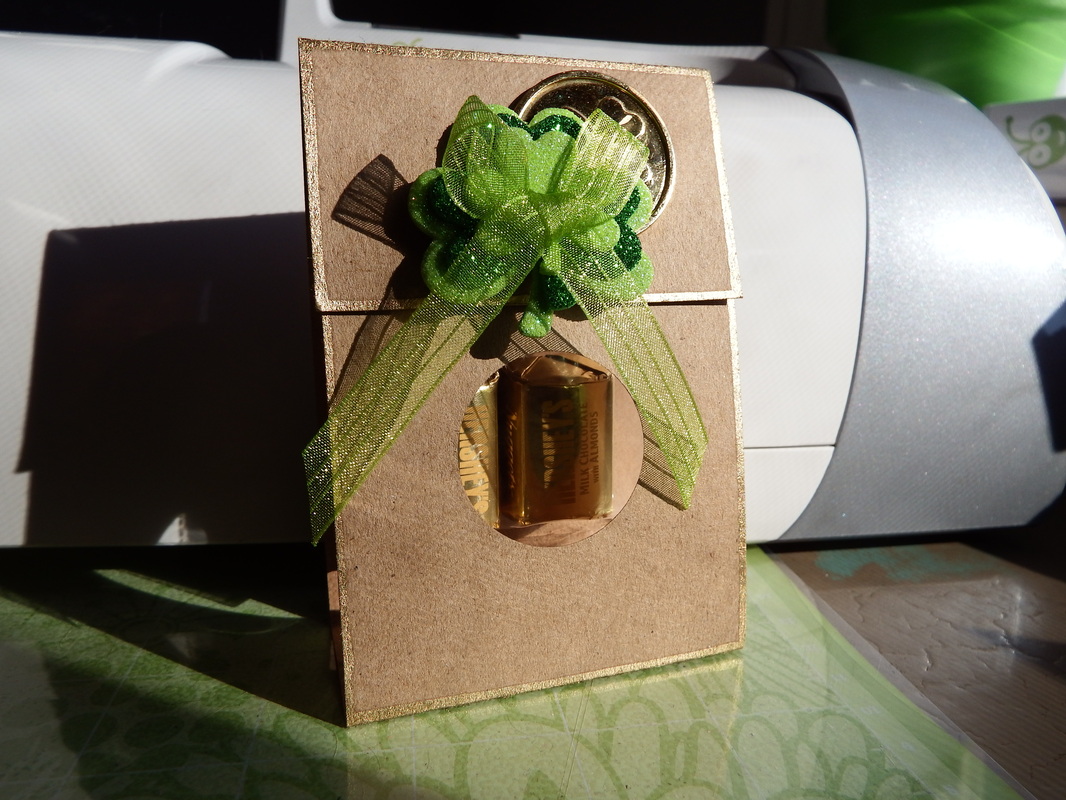
Ok, everyone remember the Valentine treat bags that was posted almost a month ago? I did say that you can change the colors and embellishments to match any holiday or occasion...so here's my St. Patrick's Day treat bags. And to make this post even sweeter...I will be giving these guys away this saturday (March 8th) to those who stop in to Michael's Class Open House. I will be set up and showcasing my scrapbooking and papercrafting projects and signing people up for classes. So stop on by and say Hi this Saturday from 11 a.m. to 2 p.m.!
I've been working on quite a few different projects lately...everything from stuff for my Etsy Store to demos for my upcoming paper crafting classes and eventually stuff for my own collection...eventually...
I've heard a lot of people say "I wish I was creative so I could make stuff like that" or "If I was a crafty person, I would make some of those things!" I'm here to tell you that with just a few very basic tools and a simple layout, YOU can make cute handmade cards that you can be proud to give to anyone! Let's not waste anytime and jump right in! | 
AuthorHi, and welcome to my blog! My name is Melissa. I'm an EMT, and a mom of 3 wonderful boys with a full schedule. But, somehow I manage to find time to craft. I have always had a love for all things crafting Now, I can share my pieces, ideas, tips, tricks and maybe even some failures (because you don't know unless you try) with my fellow DIY-ers. My Etsy Store
Follow me on Pinterest! ArchivesJanuary 2015 Categories |
 RSS Feed