Today is the day! Today is the last day of my 12 Days of Christmas Card countdown! The time has flown by and it's even closer to Christmas! But don't worry, there is still time to make and send those cards, get those treat bags and boxes decorated and make some handmade ornaments!
I have really enjoyed my time creating and showing off my designs! This countdown has forced me to step outside my comfort zone and even expand on some techniques that I was already familiar with. I hope I have been able to inspire you to create your own card...even if it's just one card! Handmade cards can be just as beautiful, if not more so that store bought.
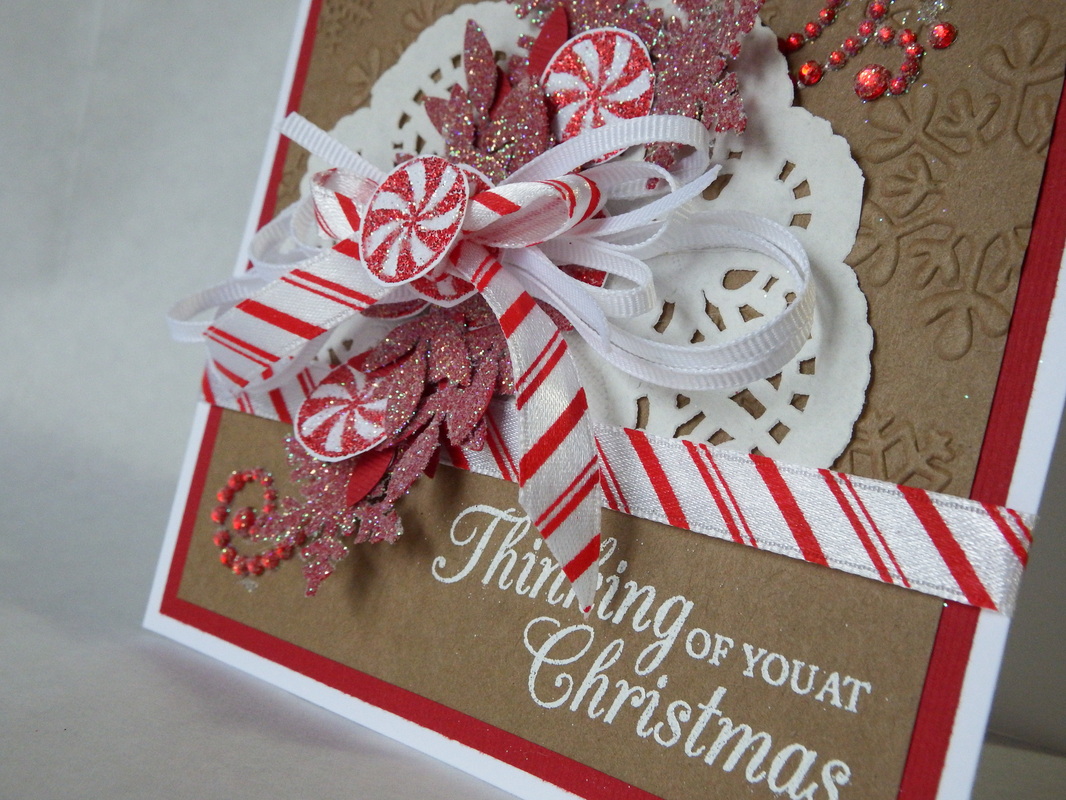
Today's card is a sort of culmination of designs. I used many techniques in creating this card. I used many different techniques such as heat embossing, dry embossing, stamping, paper punches, paper piecing, and bow making (which I'm still trying to master). The main focus of this card was created entirely by me using all of these techniques and pieced together to create one larger piece.
This card originally started out as a white and red, peppermint themed card, but as you can see, it ended up being what I would consider as a grown up sugar coated candy card...and I couldn't be any more pleased with the results! And besides...the brown makes me think of chocolate; so I guess it could be a chocolate peppermint card! Now, I want some.
How to make this card:
1. Create cardstock base. Mat with two different colors; each one 1/4" smaller than the previous. Make sure that you dry emboss the top mat prior to adhering. I left the bottom of the top mat smooth so that I could stamp my sentiment later. Wrap ribbon where the dry embossing stops and adhere with adhesive of your choice.
2. Trim a small paper doily, almost in half, and adhere just at the top of the ribbon. Place rhinestone swirls just under the doily so that they appear as they are behind and coming out from behind. Take a glue pen and rub on the rhinestones, being careful to avoid the cardstock under them. Sprinkle with very fine white glitter.
The ultra fine white glitter is key to giving your punched pieces the sugar coated effect. You will run glue over all of your punched pieces that you wish to coat.
3. I punched out my snowflakes and leaves, both using Martha Stewart punches from previous posts and glittered them. My peppermints were stamped with Versamark and heat embossed with red glitter embossing powder. I ran a glue pen over the white areas and sprinkled with the same ultra fine white glitter to give them a sugared look, also.
4. After you have all of your pieces punched out and glittered, arrange them how you like and adhere them together to create one large focal point for your card. Adhere to your base.
5. Stamp your sentiment in the smooth area below your ribbon. Stamp with Versamark and heat emboss with white embossing powder.
I have really enjoyed my time creating and showing off my designs! This countdown has forced me to step outside my comfort zone and even expand on some techniques that I was already familiar with. I hope I have been able to inspire you to create your own card...even if it's just one card! Handmade cards can be just as beautiful, if not more so that store bought.
Today's card is a sort of culmination of designs. I used many techniques in creating this card. I used many different techniques such as heat embossing, dry embossing, stamping, paper punches, paper piecing, and bow making (which I'm still trying to master). The main focus of this card was created entirely by me using all of these techniques and pieced together to create one larger piece.
This card originally started out as a white and red, peppermint themed card, but as you can see, it ended up being what I would consider as a grown up sugar coated candy card...and I couldn't be any more pleased with the results! And besides...the brown makes me think of chocolate; so I guess it could be a chocolate peppermint card! Now, I want some.
How to make this card:
1. Create cardstock base. Mat with two different colors; each one 1/4" smaller than the previous. Make sure that you dry emboss the top mat prior to adhering. I left the bottom of the top mat smooth so that I could stamp my sentiment later. Wrap ribbon where the dry embossing stops and adhere with adhesive of your choice.
2. Trim a small paper doily, almost in half, and adhere just at the top of the ribbon. Place rhinestone swirls just under the doily so that they appear as they are behind and coming out from behind. Take a glue pen and rub on the rhinestones, being careful to avoid the cardstock under them. Sprinkle with very fine white glitter.
The ultra fine white glitter is key to giving your punched pieces the sugar coated effect. You will run glue over all of your punched pieces that you wish to coat.
3. I punched out my snowflakes and leaves, both using Martha Stewart punches from previous posts and glittered them. My peppermints were stamped with Versamark and heat embossed with red glitter embossing powder. I ran a glue pen over the white areas and sprinkled with the same ultra fine white glitter to give them a sugared look, also.
4. After you have all of your pieces punched out and glittered, arrange them how you like and adhere them together to create one large focal point for your card. Adhere to your base.
5. Stamp your sentiment in the smooth area below your ribbon. Stamp with Versamark and heat emboss with white embossing powder.
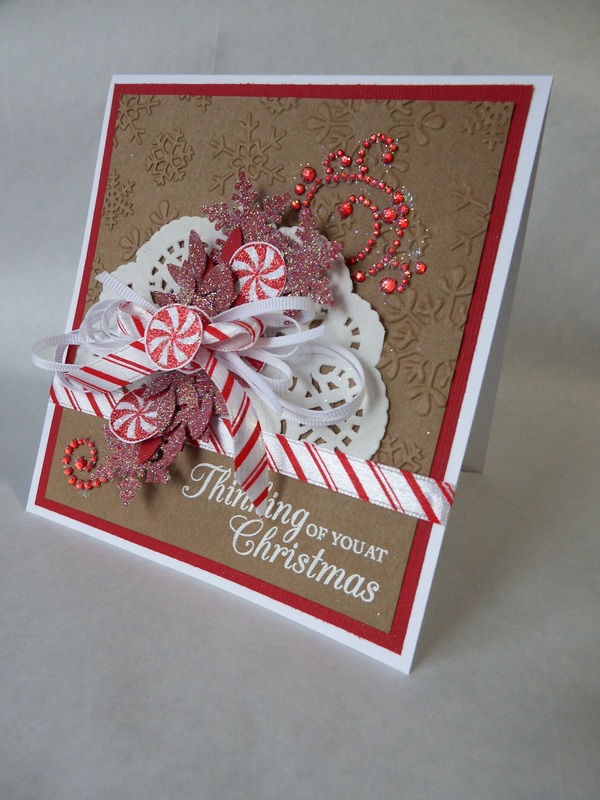
And just because it's so awesome; here's another close of my paper-piecing handy work!
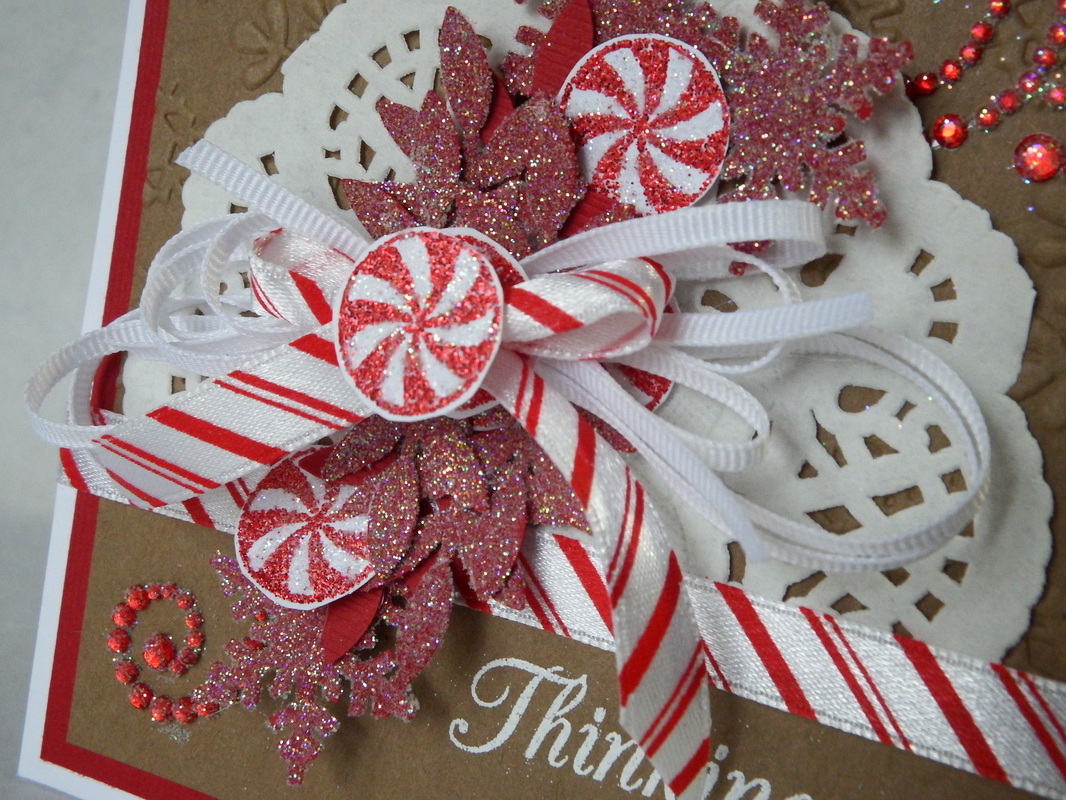
Almost good enough to eat, right? Just a few things to keep in mind though:
*Adhesive doesn't like to stick to a glittered surface so you made need a hot glue gun to get them to adhere to one another.
* This is a very thick card so you may want to hand deliver it or put it inside of a package to send. It will cost you a bit more to send and you've spent a lot of time working on it so make sure it doesn't get ruined in the mail!
I'm sad to see my countdown end but I am eager to get started on all of my holiday candy! I guess the card is a good way for me to transition in to candy making and of course the decorative packaging! I'm hoping to have some time in the next week or so to get a few of my packaging projects up! And as always....share my page with a friend of the crafty variety and spread the love. There's a handy dandy Facebook button for easy sharing! Have your own blog? Let me know so that I may visit! I love seeing new ideas and fresh projects!
Leave a comment or send me a message if you have any questions or comments. I would love to hear from you guys and know what sort of projects you would like to see next! So, until next time...
Craft on!

 RSS Feed